Installing and Configuring P4FTP
P4FTP is both an FTP server and a Perforce client application. Files that are downloaded from the FTP server are retrieved from the depot, and files that are uploaded are put into the depot. For details, see Product architecture.
This chapter tells system administrators how to install and configure P4FTP.
System requirements
There are four components you need to install and configure to use FTP to access files in Perforce depots:
- FTP client: a command-line client or a web authoring tool such as Dreamweaver, which has an FTP client embedded in it. The FTP client communicates with P4FTP.
- P4FTP: accepts requests from an FTP client and communicates with a Perforce server.
-
Perforce service: manages files in shared repositories called depots.
Note
If you use versions lower than 2000.2, P4FTP does not display files' sizes when you issue the FTP
lscommand. - Perforce application: enables you to perform Perforce tasks directly. The most commonly-used Perforce applications are P4V, the P4 command-line interface, and P4Web.
For details about installing Perforce, refer to the Helix Versioning Engine Administrator Guide: Fundamentals.
The following table shows you where the components are installed. Note that you can install two or more components on the same computer. However, the Perforce server is typically a remote computer, because there is no advantage to be gained by locating your depot on the same computer as the workspace files.
| Computer | Description | System requirements |
|---|---|---|
|
Client computer |
The computer where you work on files. |
|
|
FTP server |
The computer where you run P4FTP. |
|
|
Perforce server |
The computer where the Perforce service runs and where your repository resides. |
|
Product architecture
The following figure shows a high level view of the architecture of P4FTP:
 |
There are some important differences in behavior between P4FTP and a normal FTP server. For details about these differences, refer to “Perforce and FTP Differences”.
Installation and configuration
To install P4FTP, perform the following steps:
- Download P4FTP.
- Choose a port number.
- Start P4FTP.
- Optionally, configure P4FTP to start automatically when you reboot the computer on which it runs.
- Create Perforce users and workspace specifications.
After you perform these procedures, you can configure web authoring tools such as Macromedia Dreamweaver to use Perforce to store and retrieve your web site files. For details, see Configuring Macromedia Dreamweaver with P4FTP. The following sections tell you how to install P4FTP.
Downloading P4FTP
To download P4FTP:
-
Launch a web browser and go to:
- On the Perforce product download web page, find the version of P4FTP that is compatible with the platform where you intend to run it.
- Download the file to the directory where you intend to run it.
Note
Recommended installation directories are:
- Windows:
C:\Program Files\Perforce\ - UNIX:
/usr/bin/or/usr/local/bin/
Choosing a port number
P4FTP is a modified FTP server. Its default port number is 21, which is also the default port number for standard FTP servers. To avoid port conflicts, you can assign a different port number to P4FTP when you start it, as follows:
- Command line: specify the
-lflag when you start P4FTP. - Windows service: use the
p4 set -Scommand option to set theP4FTPPORTenvironment variable for the service. For details, see (Optional) Configuring P4FTP to start automatically.
Starting P4FTP manually
To start P4FTP manually (that is, from the command line), perform the following steps:
-
Login as the user that you want to run P4FTP.
Note
Unix users: If you want to run
p4ftpdon a privileged port (a port number lower than 1024), login as root. The default port for standard FTP servers is port21. To enable P4FTP to listen on a privileged port while running as a user other than root, specify the-u usernameflag when you startp4ftpd.Note
Windows users: open a DOS window.
-
Run
p4ftpd.When starting
p4ftpd, you can specify the host and port number of the Perforce server you want to access, and optionally the port on which P4FTP accepts FTP commands.For example, to start
p4ftpdwith its default port (21) on the same computer (namedperforce) where the Perforce server is running on its default port (1666), issue the following command:$
p4ftpdTo start
p4ftpdon port1232communicating with a Perforce server running on port2343on a remote computer namedbigcomputer, issue the following command:$
p4ftpd -p perforce.bigcomputer.com:2343 -l 1232
By default, p4ftpd submits changelists with the following
description:
[P4FTPD] Automatic changelist for uploaded files
When you start p4ftpd, you can override the default description using
the -t flag. In the description, you can specify the following macros, which
are expanded when the changelist is submitted:
| Macro | Expands to |
|---|---|
|
|
user name |
|
|
client workspace name |
|
|
host name ( |
|
|
timestamp |
For example:
$ p4ftpd -t "[P4FTP(%ftphost%)] submit by %user% from %client% at %time%"To specify the verbosity and content of debugging output, specify the
-vftp=n flag, where n is the desired level, as follows:
| Level | Description |
|---|---|
|
|
Log all connections as they arrive |
|
|
Log all successful and failed login attempts |
|
|
Log all disconnections |
|
|
Log all transfers |
|
|
Log all commands and responses to stdout as they are received |
|
|
Log all Perforce commands to stdout as they are executed |
|
|
Log all data transferred over the data channel to stdout |
Each level includes all preceding (lower) levels.
(Optional) Configuring P4FTP to start automatically
You can configure P4FTP to start automatically when its host computer is rebooted.
UNIX computers
Edit the startup scripts according to the convention for your UNIX platform. If
you intend to run P4FTP on a port other than the default, be sure to set the
P4FTPPORT environment variable in the startup script.
Windows computers
To configure P4FTP to start automatically when its host computer is rebooted, create a service as follows:
- At the DOS command prompt, change to the directory where the file
p4ftpd.exeis located. (This file is the one you downloaded from the Perforce web site. -
Create a copy of
p4ftpd.exenamedp4ftps.exeby issuing the following command:C:\>
copy p4ftpd.exe p4ftps.exe -
Create a service by issuing the following command:
C:\>
svcinst CREATE -n "Perforce FTP Server" -e "fullpath/p4ftps.exe" -awhere
fullpathindicates that you must specify the full location of thep4ftps.exefile. Windows displays the following results:Creating Service ServiceName=Perforce FTP Server ExeName=c:\Program Files\perforce\p4ftps.exe Autostart requested(To verify the service has been successfully created, use the Services control panel.)
Note
The
svcinstutility is installed when you install the Perforce service on Windows, in the same directory as the server. For more details, refer to http://kb.perforce.com/article/35 -
To specify a host and port for the service, issue the
p4 setcommand. For example, to ensure that P4FTP listens on port1892, issue the following command:$
p4 set -S "Perforce FTP Server" P4FTPPORT=1892You can also configure the user and client workspace name for the P4FTP service, for example:
$
p4 set -S "Perforce FTP Server" P4USER=bruno$p4 set -S "Perforce FTP Server" P4CLIENT=bruno
To start the service manually, use the Services control panel. The service
starts automatically when you reboot your computer. To view settings, use
regedit to display
\\HKEY_SYSTEM\CurrentControlSet\Services\`\Parameters` where
SERVICENAMESERVICENAME is the name you gave the service when you created it.
Creating Perforce users and client workspace specifications
For each user who intends to access Perforce depots using P4FTP, you must create a Perforce user and a client workspace specification on the P4FTP server computer. Perforce uses the client workspace specification to determine the location of its client workspace, where it stores files on your computer.
The following sections tell you how to create a Perforce user and client
workspace specification. Perform these steps from a computer where P4V or the
Perforce command-line interface (p4) is installed. You can direct P4FTP
to create a client specification using a template, when a user that has not
P4FTP client specification connects for the first time. For details, see
Specifying a template for undefined workspace specifications.
Using P4V
To create a Perforce user and client specification using P4V, perform the following steps.
-
Launch P4V. The Open Connection dialog is displayed.

-
Click the button next to the User field. The New User dialog is displayed.
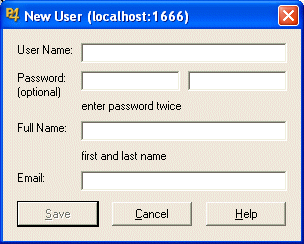
- Enter the information for the user you want to create and click to dismiss the dialog.
-
Click the button next to the Workspace field. When prompted, enter
ftp-followed by the name of the user you created in the preceding steps. The New Workspace dialog is displayed.
-
Enter the required information. Note that, because you define the client workspace on the computer where P4FTP runs, you only need to correct the
normdiroption. Check the following entries:Field Description Host name
Specify the name of the computer where P4FTP runs. For example:
mycomputer.example.orgRoot
Specify the directory on your FTP server computer where you want the Perforce client workspace to be located. P4FTP uses the client workspace as temporary local storage.
Specify a location below the root directory, such as
C:\p4client. To avoid cluttering the root directory of your computer, do not use the root directory as the root of your workspace. Choose a directory that is not used by another program or process.Options
Check rmdir. If your Perforce depot is located on a UNIX computer and your FTP client is located on a Windows computer, set the LineEnd option to
win.View
Specifies the mapping of the Perforce depot to your client workspace, to determine which files in the depot are visible to your client computer. Do not change this entry unless you understand Perforce workspace views and want to alter the mapping.
- Click to save your changes.
The user and workspace are created. You do not need to connect to the server using P4V for your entries to take effect.
Using the P4 command-line interface
To create a Perforce user and client specification using the Perforce command-line interface, perform the following steps.
-
At the command line, issue the
p4 usercommand. Perforce launches a text editor and displays the Perforce User Specification form as follows.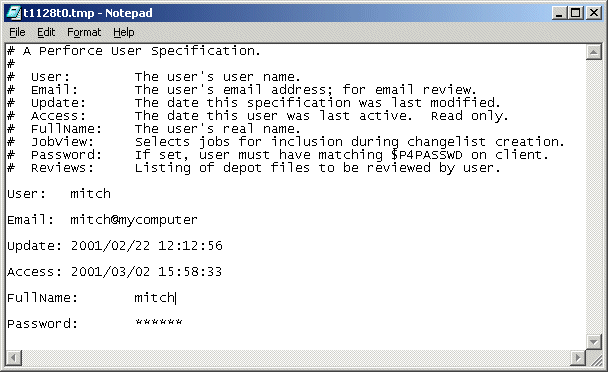
- Enter the information for the new user in the User, Email, FullName, and (optionally) Password fields.
- Save and close the file.
-
At the command line, issue the
p4 clientcommand. Perforce displays the Perforce Client Workspace Specification form as follows:
-
Change the entries in the following fields:
Field Description Client
Specify
ftp-followed by the Perforce user name.Host
Specify the name of the computer where P4FTP runs. For example:
mycomputer.example.org.Root
Specify the directory on your FTP client computer where you want the Perforce client workspace to be located. Recommendation: specify a location below the root directory, such as
C:\p4client. To avoid cluttering the root directory of your computer, do not use the root directory as the root of your workspace.Client options
Change normdir to
rmdir. If your Perforce depot is located on a UNIX computer and your FTP client is located on a Windows computer, set the LineEnd option towin.View
Specifies the mapping of the Perforce depot to your client workspace, to determine which files in the depot are visible to your client computer. Do not change this entry unless you understand Perforce workspace views and want to alter the mapping.
- Save and close the file.
Specifying a template for undefined workspace specifications
To enable P4FTP to create an ftp- client specification for users that lack
one, you can specify a template client specification. The first time a user that
lacks an ftp- client specification connects, p4ftpd creates an ftp-
client specification based on the client template. If you do not specify a
template, P4FTP requires all ftp- client specifications to exist when it
attempts to connect to the Perforce server.
The client template is an existing Perforce client specification. You define the
client template as described in Creating Perforce users and client workspace specifications. To ensure
that client roots do not conflict, you can use macros in the client root field
of the template. For example, the following client root definition directs
P4FTP to create a client root directory using the format
/data/host/user:
Root: /data/%ftphost%/%user%
To ensure that client roots do not conflict, and to tailor the client view to meet your needs, you can use macros in both the client root field and the view field of the template. For example:
Root:   /data/%user%
View:
        //depot/main/...
        //ftp-template/main/...
        //depot/user/%user%/...
        //ftp-template/%user%/...
These definitions ensure that each user’s client root is unique and map a
user-specific depot path into their client view, along with files in the
//depot/main/... path.
To specify the client template that you want P4FTP to use, specify the -T flag
when you start p4ftpd. For example:
$ p4ftpd -T ftp-myclient-templateUsing config files
You can use Perforce config files to specify client options for p4ftpd.
A config file is a text file containing specifications for Perforce client
settings. (For detailed information about config files, see the P4 Command Reference.)
In addition to the standard Perforce client settings, you can specify the
following P4FTP settings:
P4FTPPORTP4FTPPREFIXP4FTPLOGP4FTPSYSLOG(UNIX only)P4FTPCHANGEP4FTPTEMPLATE(template client specification; see Specifying a template for undefined workspace specifications)
For details about these settings, see P4FTP configuration options. Note that
p4ftpd obtains settings for P4USER, P4PASSWD and P4CLIENT from its
FTP client and therefore ignores any config file entries for these settings. Any
settings that you specify on the command line when you start p4ftpd
override corresponding config file settings.
Verifying your installation
The following sections tell you how to verify that P4FTP is up and running. Note that, to perform these procedures, your Perforce server must be running and you must have started P4FTP as described in the previous sections.
Using the command line
To verify that you have successfully installed and configured P4FTP, issue the following commands to start an FTP client and connect with P4FTP:
- At the operating system prompt, start FTP by issuing the
ftpcommand. -
At the
ftp>prompt, issue the open command to connect to the host where P4FTP is running; for example, to connect to a host namedmyhostlistening on port1234:ftp> open myhost 1234
The message
220 Perforce P4FTP FTP Server readyis displayed. - If prompted, log in.
- Display the contents of the Perforce depot by issuing the FTP
lscommand. To browse the depot and transfer files, use other standard FTP commands. - To display information about commands supported by P4FTP, issue the
helpcommand.
Using a Web browser
To verify that you have successfully installed and configured P4FTP, perform the following steps to use a browser to connect with P4FTP:
- Launch a Web browser.
-
In the URL window, enter a URL that specifies FTP protocol, the Perforce user, and the P4FTP host name and port.
For example, if P4FTP is running on
mycomputerand listening on port1850, enter:ftp://mitch@mycomputer:1850
If you are using Internet Explorer, you must specify the user password (if any) in the URL in the following format:
ftp://username:password@hostname:portnumber
-
If prompted, enter your password and click .
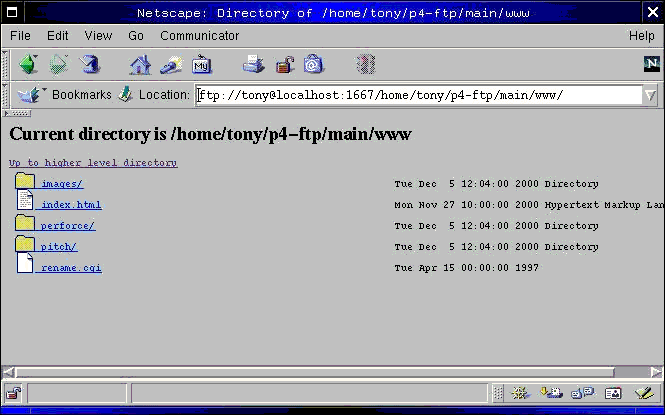
The browser displays the contents of the depot. The following figure shows a browser displaying a depot.
Automatically syncing a Perforce workspace
To configure P4FTP to automatically sync files to a specified workspace, you can
specify the following options when you start p4ftpd. You cannot start
p4ftpd in single-threaded mode (using the -f flag) if you want to use
its automatic sync feature.
Valid options are as follows:
-O autosync: Sync the entire client view every 300 seconds (five minutes).-O syncdelay=n: Sync everynseconds. The default interval is 300 seconds. If you specify this option, omit the-O autosyncoption.-O syncspec=valid_sync_specification: Sync only the specified files.valid_sync_specificationcan be any file specification you can use with the p4 sync command, including wildcards, labels or changelist numbers. By default, the entire client view is synced. If you specify this option, omit the-O autosyncoption.
The workspace that is automatically synced is taken from the environment of the
p4ftpd process when it is started, including Perforce config files. For
details about configuring workspace settings, refer to Introducing Helix. For details
about using config files, refer to the P4 Command Reference.
You can specify these settings:
- when you start
p4ftpd, or - by setting the
P4FTPOPTIONSenvironment variable before you startp4ftpd, or - in a Perforce config file in or above the directory from which
p4ftpdwas started.
If you run p4ftpd as a Windows service, you must use the P4FTPOPTIONS
environment variable to set options.
Example 1. Example
The following example sets p4ftpd to sync the entire client view
every five minutes:
$ p4ftpd -O autosyncExample 2. Example
The following example sets p4ftpd to sync the files in the
external_web directory every hour:
$ p4ftpd -O syncdelay=3600 -O syncspec=//external_web...Example 3. Example
The following example shows how to specify the preceding settings in a config file.
$ P4FTPOPTIONS="syncdelay=3600,syncspec=//external_web..."P4FTP configuration options
You can use the following environment variables to configure P4FTP.
| Environment variable | Description |
|---|---|
|
|
Specifies the TCP port to listen on. The default port is |
|
|
Specifies the prefix to be prepended to the user’s login to determine
the corresponding Perforce client workspace. The default prefix is
|
|
|
Specifies the description to be included when P4FTP submits changelists. Overrides the default description. |
|
|
Specifies the file where P4FTP logs errors. By default, errors are
sent to |
|
|
Set multiple options, including automatic syncing of the current workspace, how often to check for submitted changelists and which files to sync. Use commas to separate multiple options. For example:
$
For details about the options you can specify, see P4FTP startup options. |
|
|
UNIX only: If set, enables logging using |
P4FTP startup options
You can specify the following options when you start p4ftpd.
| Command Line Flag | Description |
|---|---|
|
|
Prefix applied to the username in order to derive the name of the Perforce client to use. Defaults to “ftp-” if not specified. |
|
|
Do not set unless your Perforce server is running in international mode (ask
your Perforce administrator, and consult the description of Valid settings:
|
|
|
Run as a daemon process (UNIX only), meaning that |
|
|
Run in single threaded mode. |
|
|
Print the command line syntax and exit. |
|
|
Started from |
|
|
Specify the TCP port number on which |
|
|
Redirect all log messages to the specified file. If not specified,
error messages are directed to |
|
|
Specifies various P4FTP settings. Specify each option separately; for example:
Valid options are:
NoteThe
|
|
|
Address of the Perforce server that serves the depot. Defaults to
|
|
|
Redirect all log messages to the syslog daemon (UNIX only). |
|
|
Specify a Perforce client to be used as a template for clients lacking a
corresponding |
|
|
Specify the description to be attached to all changelists created by P4FTP. Defaults to:
|
|
|
UNIX only: Specify the username with which the |
For example, to start p4ftpd on the local machine on port 21, running
with a non-root user and communicating with the Perforce server running on
perforce.example.org on port 1666, issue the following command:
$ p4ftpd -p perforce.example.org:1666 -l 21 -u p4ftpadministratorConfiguring Macromedia Dreamweaver with P4FTP
The following sections tell you how to configure Dreamweaver and Perforce with P4FTP so you can store your web site files in Perforce depots and access them in Dreamweaver exactly as you access remote sites using normal FTP.
Overview
The areas you must configure to use Dreamweaver with Perforce are as follows:
- Client workspace: an area of working storage on the computer where P4FTP runs. Must not overlap the local root.
- Local root: the directory where Dreamweaver stores its working copies of the web site files for editing.
- Host directory: a path relative to the root of your Perforce workspace, where Dreamweaver publishes the site’s files.
For example, if you’re running Dreamweaver on a Windows computer, P4FTP on a
UNIX computer named ftpserver and the Perforce server on a UNIX computer named
perforceserver, configure as follows:
-
Client specification for
ftp-mitch- Host:
ftpserver - Client root:
/usr/team/mitch - Client view:
//depot/... //ftp-mitch/...
- Host:
-
Dreamweaver configuration for a Web site named
marketing09- Local root:
c:\dwroot\marketing09 - Host Directory:
/main/marketing09/
- Local root:
After you configure Dreamweaver and Perforce, you use Dreamweaver’s Get, Put, Check In and Check Out menu options to store and retrieve web site files.
Creating web sites
To use Dreamweaver to create a web site that resides in a Perforce depot, perform the following steps:
- Create a folder on your computer where you want Dreamweaver to store the
local copies of your web site files. (Example:
C:\mywebsite). -
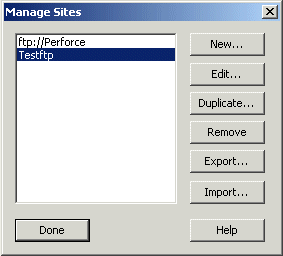
In Dreamweaver, choose → . The Manage Sites dialog is displayed.
- Click
-
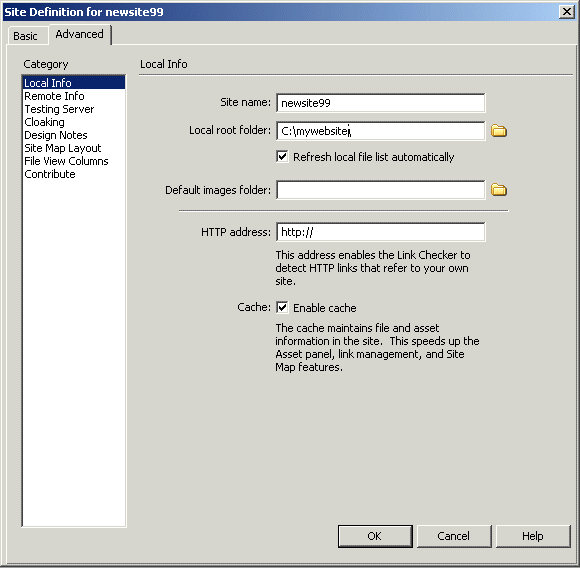
Enter the local settings for the new site, as illustrated in the following figure.
Important
In the Local Root Folder field, specify an existing directory that does not reside in your client workspace root.
- In the Category pane, click Remote Info. The Remote Info pane is displayed.
-
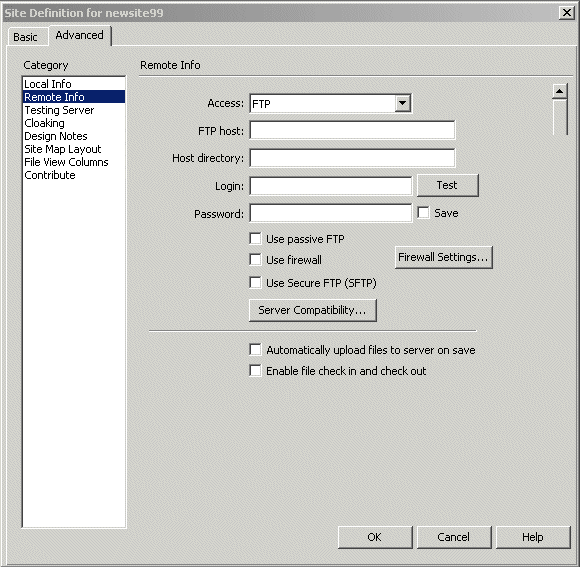
From the Access list, choose FTP. The following fields are displayed.
-
Make the following entries:
Field Description FTP Host
Enter the name of the computer where P4FTP is running and the port on which it is listening for FTP requests. For example:
myftphost:1234Host Directory
The folder in the depot where you want to store your web site files. Specify this directory as a relative path (in other words, omit the client root directory) using the operating system convention of the computer where you run P4FTP.
Login
Enter your Perforce user name.
Password
Enter your Perforce password, if you have one.
Check Enable file check in and check out only if you are working in a team environment, with locking enabled. See Working in a team environment for details.
- Click to save your entries.
You can now use Dreamweaver’s Get, Put, Check In and Check Out menu options to store and retrieve web site files in the depot.
Sample configuration
The following example provides Perforce and Dreamweaver settings for a web site
stored in a Perforce depot in //depot/websites/site001.
Perforce settings for client workspace
ftp-client root:C:\ftprootftp-client view://depot/... //ftp-myuser/depot/...
Dreamweaver remote settings for site001
- Host directory:
depot/websites/site001
Working in a team environment
If you are the only person working on Dreamweaver files, you can use the Put and Get commands to transfer files between your machine and your web site. However, in team development environments, you can configure Dreamweaver to lock files when you check them out, to prevent other users from overwriting your changes. To enable file locking:
- Start
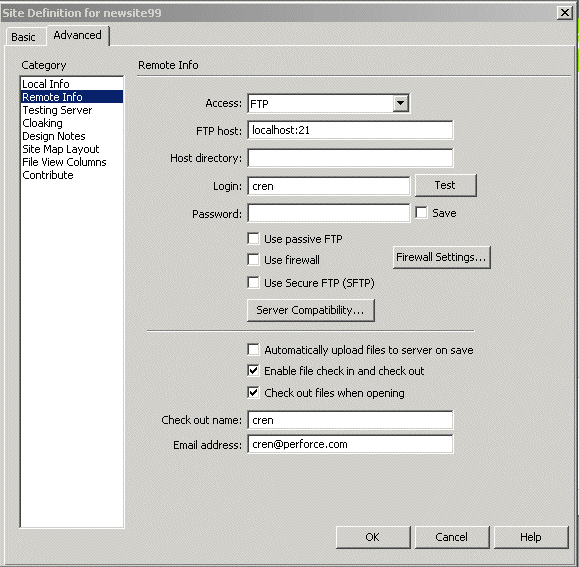
p4ftpdwith the-O dwlockingoption enabled. Note thatdwlockingonly works for Dreamweaver 2004 MX. For older releases usedw4locking. - Choose → and check Enable File Check In and
Check Out. (Note that, when Dreamweaver locks a file, it creates a
corresponding
.LCKfile.) - Use Check In and Check Out, not Put and Get, when editing files.
Note
The email address you specify when you enable locking must match the email address defined for the corresponding Perforce user.
(For details about defining Perforce users, see the P4 Command Reference or use p4
help to display information about the p4 user command.)
After you enable locking for P4FTP, Dreamweaver and Perforce respect each other’s file locks as follows:
- When you check out a file in Dreamweaver, it is opened for edit and locked in Perforce. To determine if a file is locked in Perforce, browse to the file using P4V and note whether the lock icon is displayed.
- When you open a file for edit and lock it in Perforce, Dreamweaver treats the file as checked out.
Updating a live web site
You can configure Dreamweaver and P4FTP so that, when you check a file in using Dreamweaver, a live Web site is automatically updated. To set up automatic updating, you use the autosync option to sync files from a depot to a Web server root. As you check in files using Dreamweaver, they are synced to the Web site and become live.
To set up a Web site so that, when you check files in using Dreamweaver, your live Web site is automatically refreshed, perform the following steps. This procedure assumes you already have a Web site created.
To configure automatic update, perform the following steps:
-
Create an
ftp-client workspace for your Perforce user (example:ftp-tonyz).This workspace can be rooted anywhere on your machine — it’s a scratch area for P4FTP.
-
Create a web site client workspace, rooted in the content area of your web server.
Example: if your web server is Microsoft IIS and you are creating a web site for Compass Adventures, create a workspace named
compass-website, specifying the workspace root asC:\Inetpub\wwwroot - In the web server root, set up the web site files and verify that you can view them using a browser.
-
Using P4V or the
p4command-line client, add the files to the depot (using the web site client workspace you created in step 2).For example, add the files to the depot so they reside in
//depot/Compass_WebSite/... -
On the Web server machine, set
P4CLIENTto the web site client workspace and startp4ftpd. For example, if your Perforce server is running onmyserver:1999, issue the following command:$
p4ftpd -O dwlocking -O syncspec=//depot/Compass_WebSite/... -p myserver:1999By default,
p4ftpdauto-syncs every hour. To specify a different interval, use the-O syncdelayoption. - Copy the web site files to a location on your machine where you intend to
edit them using Dreamweaver (not in a client workspace). For example, copy the
files to:
C:\Program Files\Macromedia\Dreamweaver 4\Compass_WebSite -
In Dreamweaver, define a web site (choose → ) using the following settings:
-
Local info:
- Local root folder
- the location where you want to edit files with Dreamweaver. For example:
C:\Program Files\Macromedia\Dreamweaver 4\Compass_WebSite
-
Remote info:
- Access
- FTP
- FTP host
- The machine and port where
p4ftpdis running.; for examplemywebserver:21 - Host directory
- Relative path to website files in depot, specified using local syntax. Leave blank if your web site files are located in a folder at the top level of the depot.
- Login
-
Your Perforce user name.
Enable check-in/check-out and fill in name and email.
-
- Save your settings.
- Right-click the top-level folder in the right pane and choose Put. Dreamweaver populates the left (Remote Site) pane.
Your web site is now configured so that, when you check a file in using Dreamweaver, it is also synced to the website root and therefore live.
The preceding approach uses a single instance of p4ftpd to support
Dreamweaver check-in and to sync the web site. Alternately, you can use separate
instances of p4ftpd for each purpose. Again, the instance that syncs the
web site must reside on the machine where the web site files reside.
Troubleshooting notes: adding files
If you check new files into a directory that does not exist in your Perforce depot, Dreamweaver displays the following error dialog:

Click to dismiss the dialog. The depot directory is created (typically when you exit Dreamweaver).
Configuring HoTMetal PRO 6.0
To configure SoftQuad’s HotMetal Pro to access web site files in a Perforce depot, perform the following steps. (P4FTP must be running.)
- Choose →
- Specify the name for your new site.
- On the Choose Connection Method dialog, click the I connect to my site via FTP radio button and click .
-
On the FTP settings dialog specify the following:
- Host Name: the computer where P4FTP runs
- User ID: your Perforce user ID
- If you intend to run P4FTP on a port other than the default (
21), click Advanced FTP Settings… and specify the port on the Advanced FTP Settings dialog. - On the Choose FTP Default Folder dialog, specify the depot location for
your web site. Example:
depot/websites. The depot location must already exist. Note that, if P4FTP is running, you can click the browse button and browse the depot to specify the location.
After you finish configuring the site, you can create projects and transfer files between your computer and the Perforce depot.
Configuring Hot Dog Professional 6
To obtain access to files in a Perforce depot using Hot Dog Professional 6, define a remote site as follows. (P4FTP must be running.)
- Choose Open Remote… The Open dialog is displayed.
- Double-click . The Internet Site Wizard is launched.
- In the What is your Server Address? field, specify the computer where P4FTP is running.
- In the What is your Login Name? field, specify your Perforce user name. (If you have a password, specify it in the What is your Password? field.). Click .
- In the Advanced Server Details dialog, specify the port number on which
P4FTP is configured to listen (the value specified with the
p4ftpd -lflag).
After you configure the remote site, you can access the files in the depot by choosing Open Remote and double-clicking the site.
Configuring AceHTML
To use P4FTP with AceHTML, you must install AceFTP. To configure access to a Perforce depot, run AceFTP and configure a remote site as follows. (P4FTP must be running.)
- Choose → . The Session Properties dialog is displayed.
-
On the General tab, make the following entries:
- Host Name: the name you want to assign to the host
- Host Address: the fully-qualified domain name of the computer where P4FTP is running
- User ID: your Perforce user name.
- Click the Additional tab and enter the port number on which P4FTP is
configured to listen (the value specified with the
p4ftpd -lflag). - Click Connect.
- If prompted, enter your Perforce password.
AceHTML displays the depot contents in its right pane. Use the Edit menu Upload files and Download files commands to transfer files between the depot and your client computer.