GitSwarm-EE 2017.1-1 Documentation
- GitSwarm Geo configuration
- Setting up GitSwarm
- Prerequisites
- Step 1. Adding the primary GitSwarm node
- Step 2. Updating the
known_hostsfile of the secondary nodes - Step 3. Copying the database encryption key
- Step 4. Enabling the secondary GitSwarm node
- Step 5. Replicating the repositories data
- Step 6. Regenerating the authorized keys in the secondary node
- Next steps
- Adding another secondary Geo node
- Additional information for the SSH key pairs
- Troubleshooting
- Setting up GitSwarm
GitSwarm Geo configuration
This is the final step you need to follow in order to setup a Geo node.
Table of Contents
- Setting up GitSwarm
- Prerequisites
- Step 1. Adding the primary GitSwarm node
- Step 2. Updating the
known_hostsfile of the secondary nodes - Step 3. Copying the database encryption key
- Step 4. Enabling the secondary GitSwarm node
- Step 5. Replicating the repositories data
- Step 6. Regenerating the authorized keys in the secondary node
- Next steps
- Adding another secondary Geo node
- Additional information for the SSH key pairs
- Troubleshooting
Setting up GitSwarm
**Notes:**
- Don't setup any custom authentication in the secondary nodes, this will be handled by the primary node.
- Do not add anything in the secondaries Geo nodes admin area (Admin Area ➔ Geo Nodes). This is handled solely by the primary node.
After having installed GitSwarm Enterprise Edition in the instance that will serve as a Geo node and set up the database replication, the next steps can be summed up to:
- Configure the primary node
- Replicate some required configurations between the primary and the secondaries
- Start GitSwarm in the secondary node's machine
- Configure every secondary node in the primary's Admin screen
Prerequisites
This is the last step of configuring a Geo node. Make sure you have followed the first two steps of the Setup instructions:
- You have already installed on the secondary server the same version of GitSwarm Enterprise Edition that is present on the primary server.
- You have set up the database replication.
- Your secondary node is allowed to communicate via HTTP/HTTPS and SSH with your primary node (make sure your firewall is not blocking that).
Some of the following steps require to configure the primary and secondary nodes almost at the same time. For your convenience make sure you have SSH logins opened on all nodes as we will be moving back and forth.
Step 1. Adding the primary GitSwarm node
SSH into the primary node and login as root:
sudo -iCreate a new SSH key pair for the primary node. Choose the default location and leave the password blank by hitting 'Enter' three times:
Warning: If you already have an existing SSH key pair, you should not overwrite it because that may break Helix mirroring.
sudo -u git -H ssh-keygen -b 4096 -C 'Primary GitSwarm Geo node'Read more in additional info for SSH key pairs.
Get the contents of
id_rsa.pubthe was just created:sudo -u git cat /var/opt/gitswarm/.ssh/id_rsa.pub- Visit the primary node's Admin Area ➔ Geo Nodes (
/admin/geo_nodes) in your browser. Add the primary node by providing its full URL and the public SSH key you created previously. Make sure to check the box 'This is a primary node' when adding it.
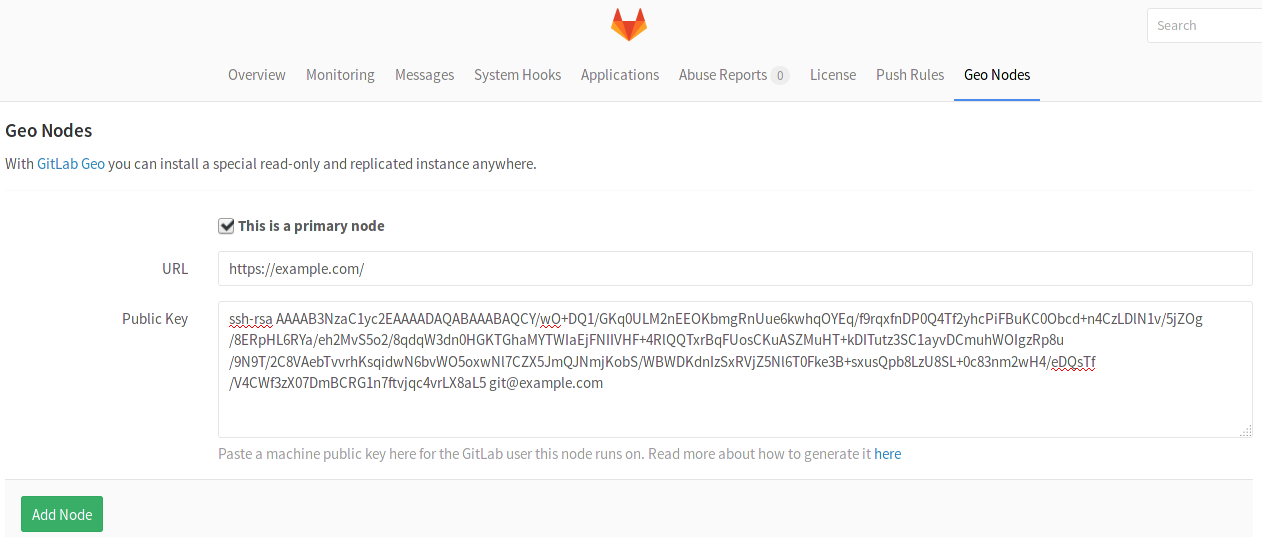
Click the Add node button.
Step 2. Updating the known_hosts file of the secondary nodes
SSH into the secondary node and login as root:
sudo -iThe secondary nodes need to know the SSH fingerprint of the primary node that will be used for the Git clone/fetch operations. In order to add it to the
known_hostsfile, run the following command and typeyeswhen asked:sudo -u git -H ssh git@<primary-node-url>Replace
<primary-node-url>with the FQDN of the primary node.Verify that the fingerprint was added by checking
known_hosts:cat /var/opt/gitswarm/.ssh/known_hosts
Step 3. Copying the database encryption key
GitSwarm stores a unique encryption key in disk that we use to safely store sensitive data in the database. Any secondary node must have the exact same value for db_key_base as defined in the primary one.
SSH into the primary node and login as root:
sudo -iFind the value of
db_key_baseand copy it:cat /etc/gitswarm/gitswarm-secrets.jsonSSH into the secondary node and login as root:
sudo -iOpen the secrets file and paste the value of
db_key_baseyou copied in the previous step:editor /etc/gitswarm/gitswarm-secrets.jsonSave and close the file.
Step 4. Enabling the secondary GitSwarm node
SSH into the secondary node and login as root:
sudo -iCreate a new SSH key pair for the secondary node. Choose the default location and leave the password blank by hitting 'Enter' three times:
sudo -u git -H ssh-keygen -b 4096 -C 'Secondary GitSwarm Geo node'Read more in additional info for SSH key pairs.
Get the contents of
id_rsa.pubthe was just created:sudo -u git cat /var/opt/gitswarm/.ssh/id_rsa.pub- Visit the primary node's Admin Area ➔ Geo Nodes (
/admin/geo_nodes) in your browser. - Add the secondary node by providing its full URL and the public SSH key you created previously. Do NOT check the box 'This is a primary node'.
Click the Add node button.
After the Add Node button is pressed, the primary node will start to notify changes to the secondary. Make sure the secondary instance is running and accessible.
The two most obvious issues that replication can have here are:
- Database replication not working well
- Instance to instance notification not working. In that case, it can be something of the following:
- You are using a custom certificate or custom CA (see the Troubleshooting section)
- Instance is firewalled (check your firewall rules)
Step 5. Replicating the repositories data
Getting a new secondary Geo node up and running, will also require the repositories directory to be synced from the primary node:
Make sure rsync is installed in both primary and secondary servers and root SSH access with a password is enabled. Otherwise, you can set up an SSH key-based connection between the servers.
SSH into the secondary node and login as root:
sudo -iAssuming
1.2.3.4is the IP of the primary node, run the following command to start the sync:rsync -guavrP root@1.2.3.4:/var/opt/gitswarm/git-data/repositories/ /var/opt/gitswarm/git-data/repositories/ gitswarm-ctl reconfigure # to fix directory permissions
Step 6. Regenerating the authorized keys in the secondary node
The final step is to regenerate the keys for ~/.ssh/authorized_keys (HTTPS clone will still work without this extra step).
On the secondary node where the database is already replicated, run:
gitswarm-rake gitswarm:shell:setupThis will enable git operations to authorize against your existing users. New users and SSH keys updated after this step, will be replicated automatically.
Next steps
Your nodes should now be ready to use. You can login to the secondary node with the same credentials as used in the primary. Visit the secondary node's Admin Area ➔ Geo Nodes (/admin/geo_nodes) in your browser to check if it's correctly identified as a secondary Geo node and if Geo is enabled.
If your installation isn't working properly, check the troubleshooting section.
Adding another secondary Geo node
To add another Geo node in an already Geo configured infrastructure, just follow the steps starting form step 2. Just omit the first step that sets up the primary node.
Additional information for the SSH key pairs
When adding a new Geo node, you must provide an SSH public key of the user that your GitSwarm instance runs on (unless changed, should be the user git). This user will act as a "normal user" who fetches from the primary Geo node.
If for any reason you generate the key using a different name from the default id_rsa, or you want to generate an extra key only for the repository synchronization feature, you can do so, but you have to create/modify your ~/.ssh/config (for the git user).
This is an example on how to change the default key for all remote hosts:
Host *                              # Match all remote hosts
  IdentityFile ~/.ssh/mycustom.key  # The location of your private key
This is how to change it for an specific host:
Host example.com                    # The FQDN of the primary Geo node
  HostName example.com              # The FQDN of the primary Geo node
  IdentityFile ~/.ssh/mycustom.key  # The location of your private key
Troubleshooting
Setting up Geo requires careful attention to details and sometimes it's easy to miss a step. Here is a checklist of questions you should ask to try to detect where you have to fix:
- Is Postgres replication working?
- Are my nodes pointing to the correct database instance?
- You should make sure your primary Geo node points to the instance with writing permissions.
- Any secondary nodes should point only to read-only instances.
- Can Geo detect my current node correctly?
- Geo uses your defined node from
Admin ➔ Geoscreen, and tries to match with the value defined in/etc/gitswarm/gitswarm.rbconfiguration file. The relevant line looks like:external_url "http://gitswarm.example.com". To check if node on current machine is correctly detected type:
sudo gitswarm-rails runner "puts Gitlab::Geo.current_node.inspect"and expect something like:
#<GeoNode id: 2, schema: "https", host: "gitswarm.example.com", port: 443, relative_url_root: "", primary: false, ...>- By running the command above,
primaryshould betruewhen executed in the primary node, andfalseon any secondary
- Geo uses your defined node from
- Did I define the correct SSH Key for the node?
- You must create an SSH Key for
gituser - This key is the one you have to inform at
Admin > Geo
- You must create an SSH Key for
- Can I SSH from secondary to primary node using
gituser account?This is the most obvious cause of problems with repository replication issues. If you haven't added the primary node's key to
known_hosts, you will end up with a lot of failed sidekiq jobs with an error similar to:Gitlab::Shell::Error: Host key verification failed. fatal: Could not read from remote repository. Please make sure you have the correct access rights and the repository exists.An easy way to fix is by logging in as the
gituser in the secondary node and run:# remove old entries to your primary gitswarm in known_hosts ssh-keyscan -R your-primary-gitswarm.example.com # add a new entry in known_hosts ssh-keyscan -t rsa your-primary-gitswarm.example.com >> ~/.ssh/known_hosts
- Can primary node communicate with secondary node by HTTP/HTTPS ports?
- Can secondary nodes communicate with primary node by HTTP/HTTPS/SSH ports?
- Can secondary nodes execute a successful git clone using git user's own SSH Key to primary node repository?
Note: This list is an attempt to document all the moving parts that can go wrong. We are working into getting all this steps verified automatically in a rake task in the future.