Perforce Servers include a basic issue-tracking feature called jobs. Jobs can be associated with changelists, so that, for example, when you check in the files that fix a bug or implement a new feature, the associated job is closed.
The Perforce Defect Tracking Gateway enables you to integrate Perforce jobs with external defect trackers, so that changes to the status of defect tracker issues are replicated in Perforce jobs and vice versa. For example, when a programmer checks code into Perforce, thereby fixing a job, the fix information can be propagated to your defect tracker, to notify QA engineers that the fix is ready for testing. The gateway enables you to specify how data is propagated between the two systems and provides a program that replicates data according to your specification.
Perforce offers a variety of plug-ins to support various defect trackers, including HP Quality Center, Bugzilla, JIRA, and Redmine. For an up-to-date list of supported defect trackers, consult the Perforce Web site. After you install a plug-in, be sure to read the product-specific documentation that is installed in the
p4dtg/doc/ directory.
Important: Defect replication is one-to-one, meaning that for each new defect, one Perforce job is created. You cannot configure P4DTG to map multiple jobs to a single defect, or multiple defects to a single job.
The data stored for each job is defined by the Perforce job specification, which can be modified by a user with administrative privileges. For details about modifying the job specification, refer to the
Perforce System Administrator's Guide.
By default, Perforce does not maintain a history of changes to jobs. However, you can create a
spec depot in which all changes to Perforce specifications are archived. For details about spec depots, refer to the
Perforce System Administrator's Guide.
For each type of defect tracker (for example, HP Quality Center), a plug-in is required. The plug-in controls which defect tracker data is made available to the gateway. To propagate data between Perforce and defect trackers, you map Perforce job fields to defect tracker fields and specify how they are propagated.
To install the Defect Tracking Gateway on Unix, download the appropriate file for your platform from the Perforce web site. Windows users: run the installer. Unix and Linux users: unpack the archive file.
To replicate with the HP Quality Center defect tracker, you must install the HP Quality Center connectivity add-in, a COM-based DLL that is used by the Quality Center plugin to communicate with the Quality Center server. Note that the Quality Center plugin is available only for Windows.
|
3.
|
Click Add-Ins Page. The Add-Ins page is displayed.
|
|
4.
|
Click HP Quality Center Connectivity. The Add-Ins page is displayed.
|
|
5.
|
Click Download Add-in, and download and save TDConnect.exe.
|
|
2.
|
Add the following fields (nnn indicates field numbers, which depend on what's already defined in your job specification. For details, refer to the description of the p4 jobspec command in the Perforce Command Reference.) Note that the DTG_MAPID field is required only if you intend to define segments for filtered replication. For details, see Filtered Replication.
|
nnn DTG_FIXES text 0 optional
nnn DTG_DTISSUE word 32 optional
nnn DTG_ERROR text 0 optional
nnn DTG_MAPID word 32 optional
|
3.
|
If not already defined, add a date field that stores the date when the job was last modified and a word field that contains the name of the user who last modified the job. In order to guarantee that the data is propagated, the field-type attribute should read always. For example:
|
nnn ModDate date 20 always
nnn ModBy word 32 always
To specify how data is replicated between Perforce and the defect tracker, you use the DTG configuration control panel. To launch the configuration control panel, double-click
p4dtg-config.exe. To configure replication, perform the following steps:
For defect trackers, the connection information depends on the requirements of the defect tracker server. For HP Quality Center, the connection information is specified using the syntax
host:port. In addition to specifying the connection information, some defect trackers (such as HP Quality Center) require you to specify the project to which you are mapping Perforce jobs.
|
1.
|
Click . The dialog is displayed, as shown in the following figure. 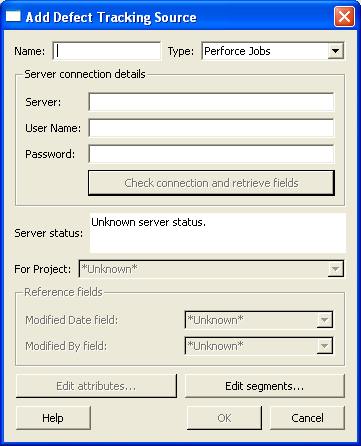
|
|
3.
|
Click . If you have correctly specified valid values, the dialog displays a success message and the reference fields retrieved from the defect tracker.
|
|
5.
|
Click to save your entries and dismiss the dialog.
|
To edit a defect tracking source, click the source in the list, then click . To delete a defect tracking source, click the source in the list, then click . The source is marked for deletion, as indicated in the list. To finish deletion, click or. To undo deletion, click the source marked for deletion, then click .
Specific defect trackers might require settings outside of those required to configure replication. For example, Bugzilla enables you to specify a MySQL database other than its default database. To configure settings for specific plug-ins, edit its attributes.
To edit attributes, click . For details about a specific field, click its help button (which is labelled with a question mark). Attributes and valid entries are specific to each plugin, and your defect tracker might not require you to set attributes.
Default attribute settings, which are provided by the plugin, are displayed in light gray. Required attributes are marked with an asterisk (*). Attribute settings are validated by the plugin when you click .
To define Perforce Server sources, you specify the information required to connect to the server (the host machine and TCP/IP port) using the syntax
host:port. The default host is
localhost, and the default port is 1666.
|
1.
|
Click . The dialog is displayed, as shown in the following figure. 
|
|
3.
|
Click . If you have entered valid values, configuration control panel retrieves the job specification for the specified server and displays the names of the reference fields, which are the Perforce job data fields required for replication.
|
|
4.
|
Click to save your entries and dismiss the dialog.
|
Your newly-defined Perforce server source is now displayed in . Perforce server sources that have been edited and need to be saved are displayed in bold.
To edit a Perforce server source, click the source in the list, then click . To delete a Perforce server source, click the source in the list, then click . The source is displayed in bold, marked for deletion, but is not deleted until you click or. To undo deletion, click the marked source, then click
Undelete.
To replicate sets of selected defects from a single data source to multiple other defect trackers or version control systems, you define
segments. For example, if you use Bugzilla to track your database bugs and HP Quality Center to track your Web application bugs, you can create separate segments for each project and replicate them independently. You can create a segment named "Database" that selects all Perforce jobs with the Subsystem field set to "db" and another segment named "Web Application" that selects all Perforce jobs with the Subsystem field set to "webapp."
After defining Perforce Server sources and defect tracker sources, you must specify how data is replicated between them when a job or issue is changed. In addition, you can configure the data that is transmitted to the defect tracker when a job is fixed in Perforce.
Before entering mappings, define the relationships between the data in Perforce jobs and the data stored by your defect tracker. To display the fields defined for Perforce jobs, issue the
p4 jobspec command. (For details about modifying the job specification, see the Perforce
System Administrators Guide.) For details about the data that is stored by your defect tracker, consult the documentation supplied by the defect tracker vendor.
|
1.
|
On the tab, click . The dialog is displayed. 
|
The dialog contains the following fields:
|
•
|
lists fields defined in the defect tracker that you can choose to replicate in Perforce jobs. Unmapped fields are displayed in bold.
|
|
•
|
lists fields from the Perforce job specification that you can choose to replicate in the defect tracker. Unmapped fields are displayed in bold.
|
|
•
|
Field mappings lists the mappings you have defined, categorized by the method and direction of replication. The mappings are displayed using a tree format, grouped by type.
|
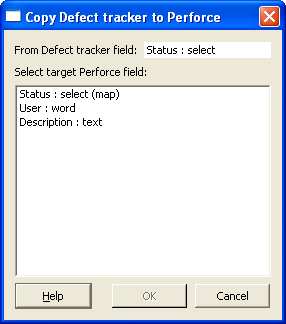
When you click a or button, a list of available target fields is displayed, as shown in the following diagram.
|
5.
|
If the target field is a select field (meaning a field that can contain one of a defined set of values), the dialog is displayed, as shown in the following figure. 
|
|
7.
|
Click to save your entries and dismiss the dialog.
|
|
8.
|
On the tab, click to save your changes.
|
After you map select fields, the field pair is listed in the pane, indicated by "(map)". To view the value mappings, place the cursor over the field pair—the mappings are displayed in a tooltip. To change the values mapped for a field, click the field in the pane and click . To remove a mapping, click the mapping in the pane, then click .
In Perforce, you can associate a job with a changelist. When the changelist is submitted, the job status is changed, usually to a "closed" status, to indicate that the changes being submitted fix the problem reported in the associated job.
The Defect Tracking gateway enables you to configure how data from fixes submitted in Perforce are transmitted to the defect tracker. To add fix mappings, click in the list.
|
1.
|
On the tab, scroll to the bottom of the Field Mappings list and select the desired mapping under . The is displayed, as shown in the following figure. 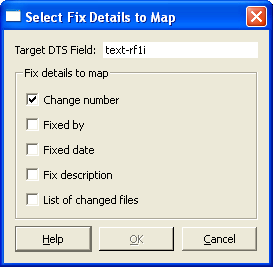
|
For each mapping (Perforce/defect tracker pair), you must run an instance of the replication engine, the program that propagates data between Perforce and the defect tracker. Before you start the replication engine, you specify the starting date and time. The replication engine propagates new jobs and issues, and changes that possess a modification date equal to or greater than the specified time. The starting date and time defaults to the current system time. If you want to replicate older issues, set the starting date to the desired previous date and time.
|
2.
|
If you have stopped the replication engine and changed mappings, check to ensure that previously replicated jobs and issues are replicated again using your new mappings.
|
The replication engine logs errors and warnings in the p4dtg/repl folder. For each instance of the replication engine, one log file is created. The log file is named
log-mapfile.log, where
mapfile is the name of the corresponding mapping.
After you stop an instance of the replication engine, be sure to examine the log file. If you are experiencing problems, check the log file. If you delete the log file, it is recreated the next time the replication engine is started.
If an error occurs during job-defect replication, the replication engine writes an error message to the
DTG_ERROR field in the Perforce job involved. Jobs containing entries in the
DTG_ERROR field are not replicated. To reenable replication, you must clear the
DTG_ERROR field.
To list all jobs that have entries in the DTG_ERROR field, issue the following command:
If the replication engine encounters a problem that prevents it from successfully replicating data, it logs error information to a file named
err-
mapfile in the
repl folder. The replication then exits and cannot be restarted until you resolve the problem and delete the error file.
Copyright 2006-2014 Perforce Software.